Business Intelligence
How to Set Up OAuth for MCP: Per-User Data Permissions for AI Agents
Use per-user OAuth for MCP to run AI queries as each user, map scopes to warehouse roles, and verify with side-by-side tests.
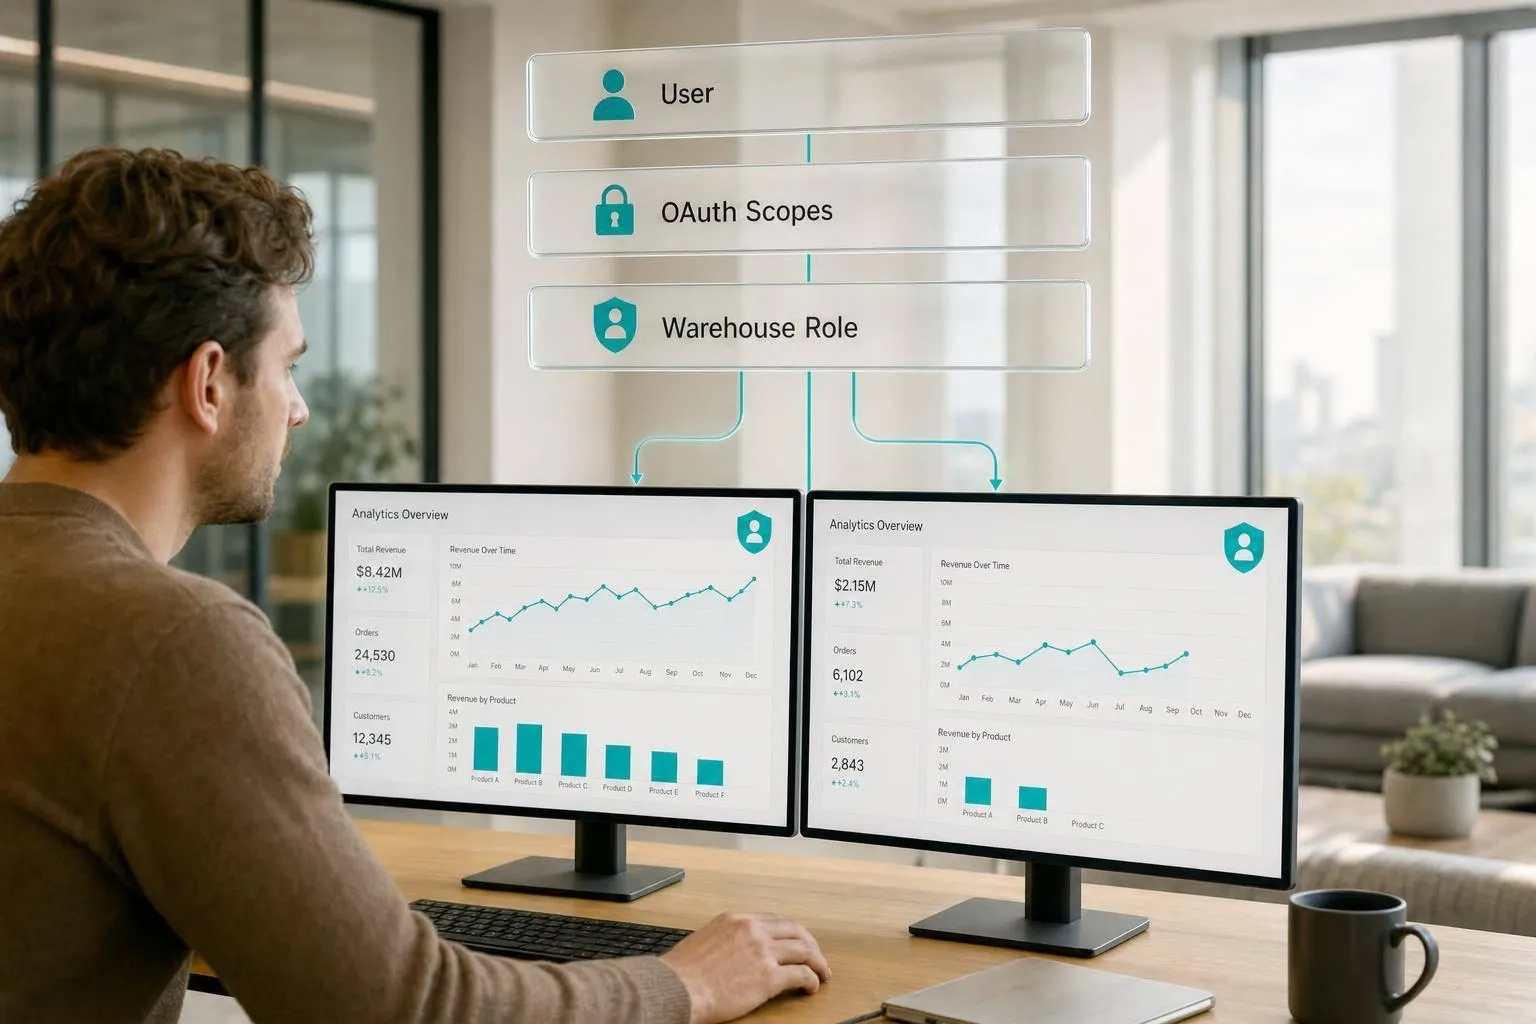
If your AI agent queries data with one shared account, every user can end up looking like the same person in your logs. I’d fix that by using OAuth so each MCP request runs with the signed-in user’s identity, roles, and row filters.
Here’s the short version:
- OAuth lets Claude or ChatGPT act as the user, not a shared bot
- Your warehouse still enforces access through roles, row-level security, and masking
- Audit logs stay tied to actual people
- The core setup has 3 parts: OAuth app setup, scope-to-role mapping, and a two-user test
- The fastest proof check is simple: same prompt, two users, different results
In practice, I’d keep the flow like this:
- The user signs in and approves access
- The MCP client sends the token through Querio
- Querio maps identity claims to warehouse roles or session settings
- Snowflake, BigQuery, Redshift, Postgres, or Looker applies that user’s current access rules
A shared service account may be easier at first. But it creates one large failure point, weak user-level logging, and app-side permission logic that can drift from what the warehouse says.
Here’s the main difference at a glance:
| Setup | Who runs the query? | Row-level security | Audit trail |
|---|---|---|---|
| Shared service account | One bot identity | Often handled in app logic | Bot-only logs |
| Per-user OAuth | The signed-in user | Enforced by the data system | User-level logs |
I’d keep the rollout focused on a few checks:
- register the OAuth client with exact redirect URIs
- use Authorization Code with PKCE
- keep scopes narrow, like
snowflake:query.read - map claims such as
departmentorregionto roles or filters - store tokens encrypted and keep them out of prompts and logs
- test revocation and confirm access fails closed
One stat that matters: the article’s setup uses four moving parts - user, MCP client, Querio MCP server, and identity/data systems. If those four pieces pass identity through cleanly, the model does not need to guess who should see what.
That’s the whole goal: the AI answers the question, but the warehouse still decides which rows the user can see.
::: @figure 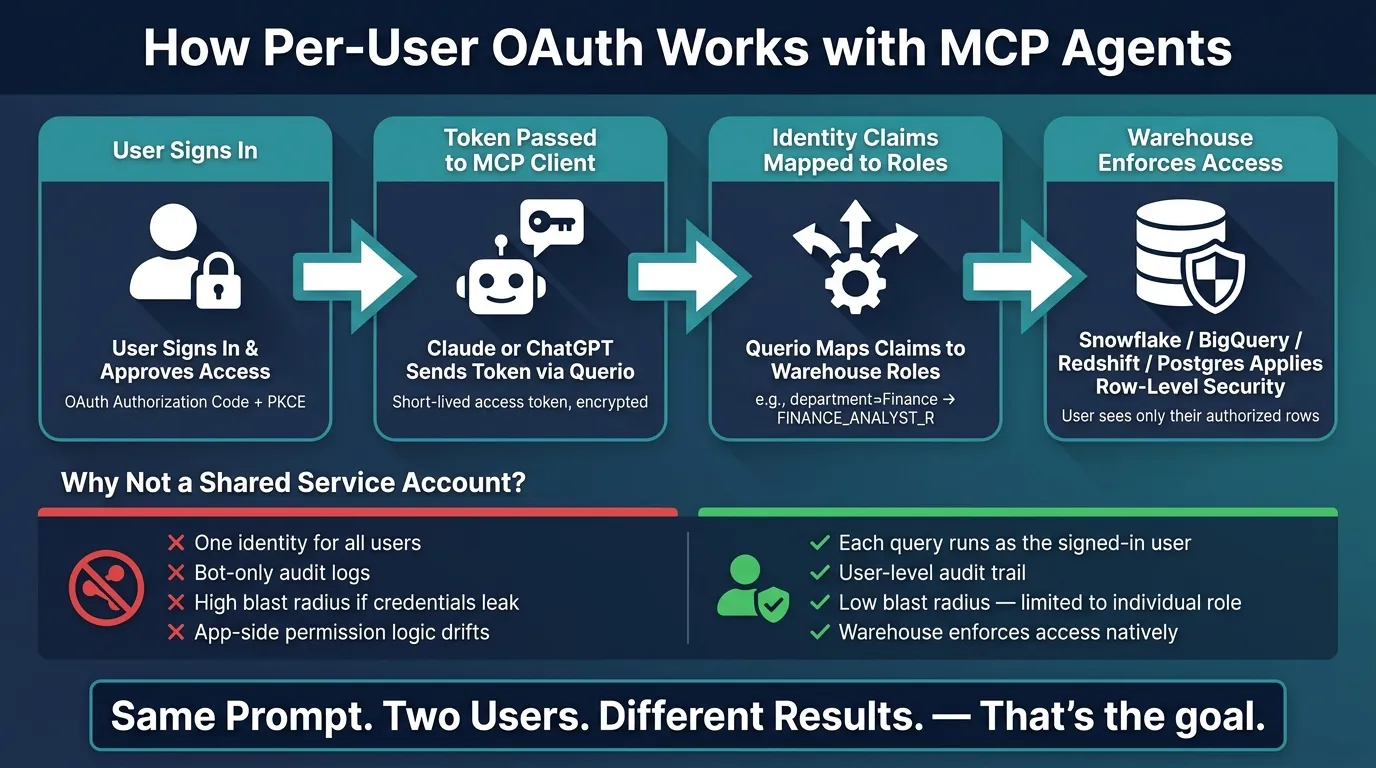 {How Per-User OAuth Works with MCP: End-to-End Flow}
:::
{How Per-User OAuth Works with MCP: End-to-End Flow}
:::
Step 1: Configure OAuth between the MCP client and your MCP server
Register the OAuth client and consent screen
Start in your identity provider's management console and create a dedicated OAuth app for your MCP server. Save the client_id and client_secret. Also keep separate credentials for local development, staging, and production, so test traffic doesn't get mixed in with live traffic.
Redirect URIs must match exactly. Set one for local development, like http://localhost:3000/callback, and one for production, like https://app.example.com/callback. Even a one-character mismatch, including a trailing slash or a difference in case, can trigger an OAuth redirect error.
Keep the consent screen narrow and easy to scan. Ask only for the scopes the agent needs, such as warehouse.read for query execution or bi.explore for dashboard browsing. If your organization has multiple business units or tenants, spell out the tenant or business-unit boundary in the app name, description, and consent text. That way, users connect to the right data domain.
Expose MCP auth metadata and token exchange endpoints
Expose OAuth metadata so MCP clients can discover authorization and token exchange on their own, without custom client setup.
Publish OAuth 2.0 Protected Resource Metadata at /.well-known/oauth-protected-resource and OAuth 2.0 Authorization Server Metadata at /.well-known/oauth-authorization-server. The authorization server document should list the authorization endpoint, token endpoint, and supported scopes. If a request arrives without a valid token, return 401 with a WWW-Authenticate header that points to the resource metadata URL. That gives Claude or ChatGPT a way to discover Querio's auth flow at runtime without custom wiring.
Keep access tokens short-lived and authorization codes brief. Store refresh tokens encrypted at rest. Log token lifecycle events - grant, issuance, refresh, and revocation - along with the user identity, tenant, and scopes. Keep raw tokens out of the model and handle them in the app layer.
Choose managed auth or per-user sign-in
Choose the model that fits how identity needs to reach Snowflake, BigQuery, Redshift, or Postgres.
Org-managed auth makes offboarding, access reviews, and incident response much simpler, while still keeping user-level identity in logs and downstream authorization. Per-user sign-in makes sense when each employee must connect their own IdP account and control their own permissions. It gives direct user-level control, but it also adds more overhead because you're dealing with many separate connections instead of one centrally governed policy.
| Consideration | Org-Managed Auth | Per-User Sign-In |
|---|---|---|
| Offboarding | Centralized deprovisioning through the IdP | Each user disconnects their own account |
| Audit trail | Centralized and policy-driven | Tied to each individual user connection |
| Setup complexity | Lower after the initial org-level setup | Higher because every user authorizes separately |
| Permission source | Inherited from org roles and groups | Bound directly to each user's account |
Use Authorization Code flow with PKCE, and generate a new code verifier and code challenge for each login. Avoid Implicit and Resource Owner Password grants; they don't fit this pattern.
Once OAuth is working, map those scopes to Snowflake or BigQuery roles and row filters.
Secure AI Agents with OAuth 2.1 & MCP: End-to-End Architecture (Keycloak + GitHub Copilot)
::: @iframe https://www.youtube.com/embed/z9UG8oOxC0w :::
Step 2: Define scopes and map permissions into Snowflake, BigQuery, and BI tools
OAuth identifies the user. Warehouse roles and BI filters decide what that user can get back. Step 2 is where those two layers meet. The job here is simple: define scopes as narrowly as you can, then map them to the access rules each downstream system already uses.
Define MCP scopes by tool and action
Name each scope after the exact system and action it allows. That keeps access clear and easy to audit.
For example, snowflake:query.read tells you this scope allows SELECT-only access to approved Snowflake schemas. A broad scope like data.read sounds neat, but it opens the door too wide for governed access.
A solid starting set looks like this:
snowflake:query.readfor analytics queriesbigquery:dataset.finance.readfor finance datasetspostgres:read_onlyfor reporting schemaslooker:explore.readfor dashboard browsing
Keep write scopes such as bigquery:dataset.any.write and snowflake:admin.role_manage limited to a small, audited group. Also, split discovery from execution. In plain English, a user might be allowed to browse available tables without also being allowed to run any SQL they want against them.
Map identity claims to warehouse roles and row filters
After a user signs in, the OAuth token carries claims like email, department, region, and group membership. The MCP server takes those claims and maps them to the warehouse identity that will run the query.
In Snowflake, you can map department claims straight to roles. If department=Finance, the user gets FINANCE_ANALYST_R. If department=Sales and region=US, the user gets SALES_US_R. From there, apply a row access policy on sensitive tables so rows are filtered based on the active role.
Snowflake’s docs suggest using a central mapping table, such as USER_ACCESS_MAP, to connect identity attributes like region or business unit to the row sets a user is allowed to see. That tends to scale better than stuffing every rule into the policy itself. [1][2] Snowflake External OAuth also supports scope-to-role mapping through session:role:<custom_role>, which means the user’s effective role can travel inside the OAuth token. [6][7]
BigQuery works a bit differently. It ties access to Google identity. When the MCP server gets a token for the user’s Google identity, BigQuery applies dataset- and table-level access through IAM. For row filtering, BigQuery row access policies run at query time, and users or groups that aren’t on the allowed list can’t see those rows. [4][3]
A common setup is to use two policies per table:
- one full-access policy for admin or support roles
- one filtered policy for business users
For instance, a US sales group might only see rows where country = 'US'. [3][5]
If you use a shared technical account for Postgres or Redshift, the pattern changes again. In that case, map OAuth claims to SET ROLE and session variables before any query runs. So the MCP server might execute SET ROLE sales_readonly and SET app.region = 'US' based on the user’s claims, then run the AI-generated query.
That setup lets row-level security on the orders table filter with region = current_setting('app.region'). The result is exactly what you want: a US rep never sees records from other territories.
In Looker, the main control is user attributes. Create a non-editable attribute like allowed_region, set it from the user’s OAuth claims, and reference it in an access_filter on the right Explore. Looker then injects that filter into every query generated by the Explore. You can check the SQL afterward and confirm the expected WHERE clause is there. [8][9]
This mapping layer is what makes the same prompt return different results for different users. In Querio, each mapped identity also creates inspectable, editable SQL before execution, which gives the data team a clear view of what the warehouse received for each user.
Comparison table: permission propagation across common systems
Use the table below to check which identity signal each system needs before the query runs.
| System | Core enforcement object | Identity source | Native row-level security | What the MCP server must pass |
|---|---|---|---|---|
| Snowflake | Row access policy + role | Snowflake role via External OAuth scope | Yes | Mapped role and any session attributes needed for policy logic |
| BigQuery | IAM + row access policy | Google principal or group | Yes | The user's Google identity token and dataset/table access context |
| Redshift / Postgres | Database role + RLS policy | Session variables set by MCP | Yes, via SET commands |
Role name and session variables like region or department |
| Looker | Access filter + user attribute | Looker user attribute | Yes, via Explore-level filters | User attribute values such as department, region, or customer ID |
OAuth handles sign-in. The warehouse or BI tool handles authorization. The MCP server sits in the middle and passes the exact identity context each system needs before any row comes back.
With scopes and mappings set, the next move is to test two users with the same prompt and confirm the returned rows are different.
Step 3: Run the end-to-end flow in Querio and confirm users see different results
At this stage, you’re testing whether claims-to-role mapping works the way it should in practice, not just on paper.
The simplest way to check it is to run the same prompt under two different identities and see whether each person gets the result set they’re supposed to get.
Example flow: Claude or ChatGPT to Querio to Snowflake or BigQuery
Alice's token maps to SALES_MANAGER_ROLE. Bob's token maps to SUPPORT_ANALYST_ROLE. The identity claim passes through Querio, maps to a warehouse role, and controls the result set.
Both users ask the same question through a Querio-powered MCP agent: "Show me the top 20 customers by revenue last quarter."
In Snowflake, Alice reads the broader authorized table. Bob reads the restricted view with the support filter. In BigQuery, those same claims map to the matching authorized view and row policy. Warehouse policies enforce the boundary.
Same prompt. Different user. Different result.
Validation workflow: test two users against the same prompt
Run this test before go-live and again after any major permission change.
-
Create two test identities in your IdP:
alice.sales@example.comin theSales_Managersgroup andbob.support@example.comin theSupport_Analystsgroup. -
Map roles and prepare test data: in Snowflake, create
SALES_MANAGER_ROLEandSUPPORT_ANALYST_ROLEwith different table access and row policies. In Querio, set the mapping from IdP group claims to those roles. Include rows that are clearly in scope for Alice but not Bob. -
Run the same prompt for both users via Claude or ChatGPT. Capture the result set, the generated SQL from Querio's notebook, and the effective warehouse role used for each session.
-
Compare results and audit logs: confirm Bob's result set is narrower than Alice's and references the restricted view with the correct filter predicate. In Snowflake query history and BigQuery job logs, confirm each query is tied to the individual user's identity, not a shared service account.
-
Run a negative test: temporarily revoke Bob's access to the revenue dataset and repeat the prompt. The agent should return an access denied response.
Then inspect Querio's authorization logs for each run. You should see the incoming token claims, the resolved warehouse role, and any extra filters applied.
Comparison table: shared service account vs. per-user OAuth
The case for per-user OAuth comes down to blast radius and accountability.
A shared service account is faster to set up. But it also creates one bad failure point: if the credentials leak, everything the bot can see is exposed. Per-user OAuth keeps each session limited to exactly what that person is allowed to access.
| Dimension | Shared service account | Per-user OAuth (Querio) |
|---|---|---|
| Blast radius | High - a leaked key exposes all data the bot can see | Low - limited to the individual user's warehouse role |
| Audit trail | Weak - all queries log as the bot, not the human | Strong - every query is attributed to a specific user |
| Row-level security | Manual, hardcoded in the application layer | Native - enforced by the warehouse per session |
| Offboarding | Complex - requires rotating shared credentials | Simple - revoke access in the IdP |
| Governance fit | Inconsistent; logic lives outside the warehouse | Centralized in the semantic layer; consistent across all surfaces |
For healthcare or finance teams, that audit trail difference matters. Every query is tied to a real user, which makes access reviews and permission audits much easier. If this test passes, move to the production checklist.
Secure setup checklist and next steps
If Step 3 passed, it’s time to lock down the production setup: token storage, audit logs, and revocation. The target hasn’t changed. Every query should run as the signed-in user. Use the checklist below to tighten the flow before rollout.
Checklist: production-ready MCP OAuth in one evening
Work through these items in order. Each one fixes a gap that shared service accounts leave behind.
| Checklist Item | What "done" looks like |
|---|---|
| OAuth client registered | MCP is registered in Okta, Auth0, Azure AD, or Google Workspace with exact redirect URIs and clear consent text |
| Scopes defined by tool and action | Narrow scopes mapped to the minimum warehouse role |
| Tokens encrypted at rest | Stored in a secrets manager and never written to logs, configs, or prompts |
| Short-lived access tokens | Access tokens expire fast; refresh tokens rotate |
| Audit logging enabled | OAuth events, MCP calls, and warehouse queries are tied back to the user |
| Warehouse role mapping documented | IdP groups map to warehouse roles, and row-level security is verified |
| Semantic layer reviewed | Only certified tables and governed metrics are exposed; raw PII stays out |
| Revocation tested | Deprovision a test user, revoke tokens, and confirm the agent fails closed |
| Side-by-side user test passed | Two users, one prompt, different results, with correct log attribution |
If every item passes, the setup is ready for production use.
Key points to carry into rollout
Once the checklist is done, keep the warehouse as the source of truth for access control. The agent takes on the user’s identity. The data platform decides what that identity can see. MCP is the pipe, not the gatekeeper.
That’s why your Snowflake roles, BigQuery IAM bindings, Redshift grants, Postgres row-level security, and BI tool permissions should stay authoritative. The MCP layer should follow those controls, not rebuild them in prompt logic or model reasoning. If you still have a shared warehouse account with broad access, phase it out.
Every AI answer should show its SQL or Python. Querio surfaces the generated query in an inspectable, editable notebook so analysts can check what ran. If there’s no visible query, there’s no audit trail. In healthcare or finance, that’s a risk you don’t want.
Run the side-by-side user test on a regular basis so over-permissioning gets caught before it hits production.
FAQs
::: faq
How do I map OAuth claims to warehouse roles?
Configure your MCP server so it passes the signed-in user’s identity claims, like email or user ID, into each warehouse session or role context. That way, every query runs under that user’s permissions instead of a shared, all-access setup.
This matters because access control often lives inside the warehouse itself. If the user’s identity never makes it into the session, row-level rules can’t do their job.
For example:
- Snowflake can use
current_userorcurrent_rolein row access policies. - BigQuery can map claims through IAM to row-level security.
- PostgreSQL and Redshift can use session variables for RLS.
After setup, test it with different users. A simple check is to sign in as two people with different access levels and confirm they see different results from the same query. :::
::: faq
What’s the difference between org-managed auth and per-user sign-in?
Org-managed auth often relies on one shared service account with static credentials. That means the AI agent can end up with broad, persistent access to the warehouse, which makes over-permissioning more likely.
Per-user sign-in uses OAuth to verify each user, so the agent takes on that person’s roles and permissions at runtime. As a result, row-level security, column masking, and role-based access controls apply automatically. :::
::: faq
How do I test that two users see different results?
Log in as a sample user for each role in Snowflake or BigQuery. Run the same queries for every role, including queries that ask for data outside that user’s allowed scope. Check that each user either sees only the rows they’re allowed to see or gets an access denial.
Then run negative tests. Review logs for user identity, SQL text, and the objects each query touched. After that, compare the results with trusted outputs in dbt, Looker, or Hex. :::