Your Guide to Flawless Power BI Embedding for Modern Apps
Master Power BI embedding with our guide. Learn to navigate licensing, secure authentication, RLS, and SDKs to seamlessly integrate powerful analytics.
https://www.youtube.com/watch?v=4KuyPNtVijo
published
Outrank AI
power bi embedding, embedded analytics, power bi sdk, row-level security, app owns data
5f1079ba-638f-48b8-bc90-48d74bfa820a

Imagine your app doing more than just showing data. What if it could deliver rich, interactive insights right where your users are working, making those insights feel like a natural part of the application itself? This is precisely what Power BI embedding makes possible. It’s about moving analytics out of standalone dashboards and weaving them directly into your app's user experience.
We're not just talking about dropping a few charts onto a page. This is about fundamentally changing how users work and empowering them to make decisions in real-time, without ever leaving your application.
Why Power BI Embedding Is a Game-Changer for Your App
Long gone are the days when users were content with exporting data to a spreadsheet or logging into a separate BI tool for analysis. The modern expectation is for analytics to be available right at the point of action—inside the business apps they rely on every day. Power BI embedding is the perfect bridge for this, letting you integrate fully interactive Microsoft Power BI reports and dashboards into any web or mobile app.
This approach creates a completely seamless experience, positioning your application as the definitive source of truth. Users stay in their flow, getting the self-service BI they need without having to ask your data team for yet another custom report. It’s a massive win for everyone, boosting user engagement and reducing the analytical backlog.
Gaining a Competitive Edge
By bringing analytics directly into your product, you elevate it from a simple task-management tool into an essential platform for insight. This alone can give you a serious competitive advantage. Your product no longer just does something; it provides the intelligence needed to drive smarter business decisions.
Here's what that looks like in practice:
Deeper User Engagement: Interactive reports keep users within your app, encouraging them to explore data and discover insights on their own.
Faster, Smarter Decisions: With data presented in context, users can act on information instantly. No more app switching.
Higher Product Value: Embedded analytics can easily become a premium, revenue-generating feature.
Lower Development Costs: Why build a custom analytics engine from the ground up? It’s expensive and slow. Power BI offers a mature, powerful solution right out of the box. You can learn more by exploring the core concepts of what are embedded analytics.
Tapping into a Growing Market
The demand for this kind of integrated experience isn't just a hunch; it’s a market trend that's accelerating rapidly. The embedded analytics market hit $78.21 billion in 2025 and is on track to reach $152.28 billion by 2029, growing at an impressive 18.1% CAGR. This explosive growth is fueled by one thing: the universal need for real-time insights within business workflows.
When you integrate Power BI, you aren't just adding a feature. You're aligning your product with a critical technology shift that is fundamentally reshaping user expectations and modern software design.
Power BI is also a key component of the wider Microsoft Power Platform, a suite of tools designed to streamline business processes. Tapping into this ecosystem gives you enterprise-grade security, scalability, and a constant stream of innovation from Microsoft. It’s a strategic choice that will pay dividends, especially as we head toward 2026.
2. Choosing Your Licensing and Embedding Model
Before you write a single line of code, you’ll face the first big crossroad in your Power BI embedding journey: picking the right licensing and embedding model. Getting this decision right from the get-go is absolutely critical. It will shape your application's architecture, dictate your costs, and determine how you handle security.
The two paths you can take—Embed for your organization versus Embed for your customers—are designed for completely different worlds. Your choice here impacts everything that follows, from your authentication strategy to your development workflow.
Embed for Your Organization (User-Owns-Data)
Let's start with the simpler model. This approach, often called "user-owns-data," is tailor-made for internal tools. Think about a custom portal for your sales team to track quarterly goals or an executive dashboard embedded right into your company’s intranet.
In this scenario, every single person who views the report needs their own Power BI license—usually a Pro or Premium Per User (PPU) license.
Authentication is straightforward because it leans on your existing Microsoft 365 setup. When someone logs into your app, they authenticate using their own corporate credentials through Microsoft Entra ID (which you probably still call Azure AD). If all your users are internal employees, this is your most direct route.
Embed for Your Customers (App-Owns-Data)
On the flip side, you have the "app-owns-data" model. This is a totally different beast, built for any application that faces the outside world, like a customer portal for your SaaS product or a data-rich experience for your partners.
Here’s the key difference: your end-users don't need a Power BI license. Not a single one. Instead, your application itself authenticates to Power BI using a dedicated identity, typically a Service Principal. Your app essentially "owns" the data and is responsible for serving it up to your users.
This is probably the most important distinction you'll make. If you're building a commercial product or a portal for external users, 'app-owns-data' is your only real option. Trust me, trying to manage thousands of Power BI licenses for your customers is a logistical and financial nightmare you want to avoid.
This quick flowchart can help you visualize the decision.
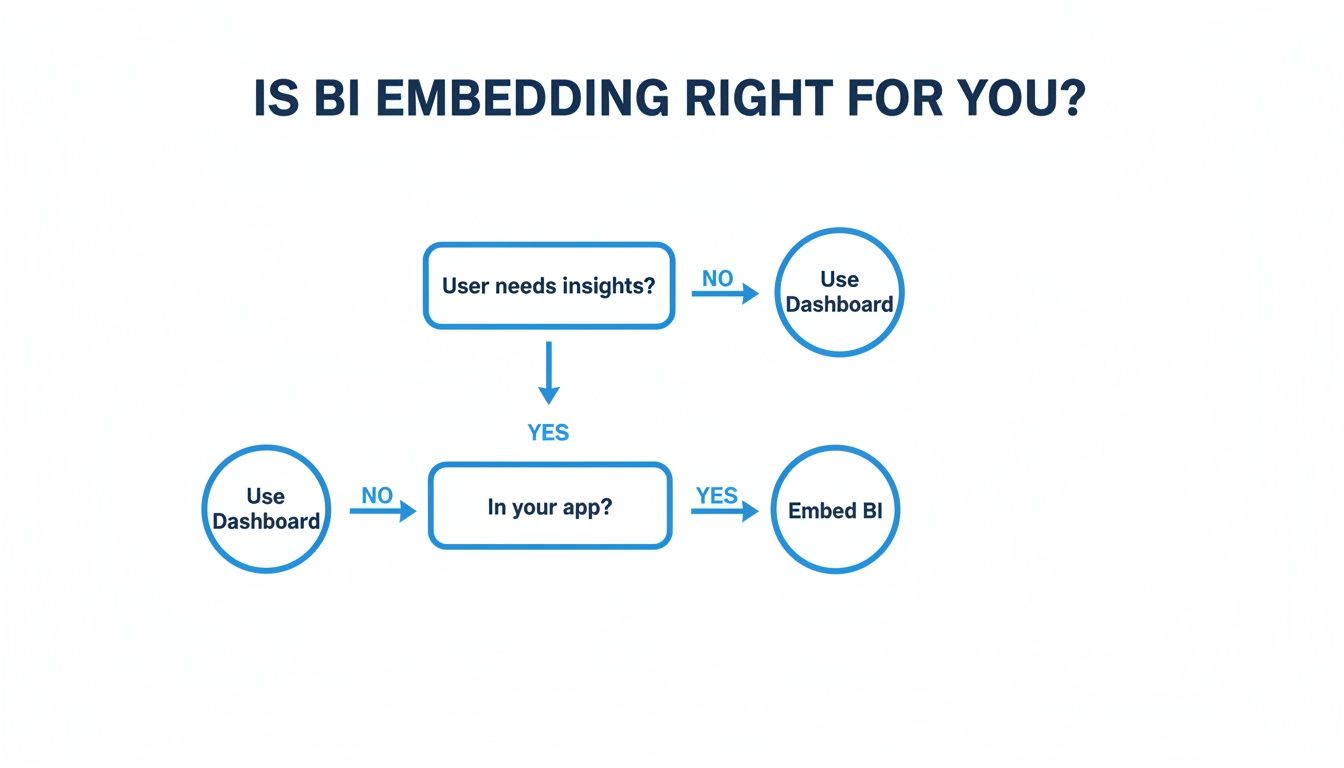
As you can see, if your users need analytics seamlessly integrated into their workflow within your app, embedding is the way to go.
A Quick Comparison
To make this choice crystal clear, here’s a breakdown of how the two models stack up against each other.
Power BI Embedding Models At a Glance
Feature | Embed for Organization (User-Owns-Data) | Embed for Customers (App-Owns-Data) |
|---|---|---|
Primary Use Case | Internal-facing applications (e.g., employee portals) | External-facing applications (e.g., SaaS products, customer portals) |
User Licensing | Each user needs a Power BI Pro or PPU license. | End-users do not need any Power BI licenses. |
Authentication | Users authenticate with their own Microsoft Entra ID credentials. | Application authenticates using a Service Principal or Master User. |
Capacity Required | Uses shared capacity or Premium Per User. | Requires dedicated Power BI Embedded or Fabric capacity (A/F SKUs). |
Cost Model | Per-user licensing costs. | Capacity-based pricing, independent of the number of users. |
Best For | Organizations already invested in the Microsoft 365 ecosystem. | ISVs and companies building multi-tenant applications for external users. |
Choosing the right model from the start saves you from costly rework and security headaches down the line.
The Big Shift from Premium to Fabric
For the "app-owns-data" model, you have to purchase dedicated capacity to handle the rendering load. For years, this meant buying a Power BI Premium (P-SKU) or Power BI Embedded (A-SKU). However, Microsoft's strategy has fundamentally changed with the introduction of Microsoft Fabric.
Microsoft is phasing out the old Premium P-SKUs in favor of Fabric F-SKUs, and this isn't just a name change. Fabric is an all-in-one analytics platform that bundles Power BI with data engineering and data science tools like Azure Data Factory and Synapse Analytics. It’s all built on a unified data lake called OneLake, creating a single source of truth for all your analytics.
For anyone starting a new project today, you'll be purchasing Fabric capacity (F-SKUs). This gives you all the embedding power you need plus access to the entire Fabric suite. It’s a huge advantage, allowing you to manage your whole data pipeline—from ingestion to final visualization—in one place. To plan your budget, check out our comprehensive guide on embedded analytics pricing.
Making the Call: Real-World Scenarios
Let’s ground this in a couple of concrete examples.
Scenario 1: Internal Sales Dashboard
The Goal: Build a portal for 150 internal salespeople to track their performance against regional targets.
The Users: All are company employees with existing Microsoft 365 accounts and Power BI licenses.
The Verdict: Embed for your organization (user-owns-data). It’s the clear winner. The infrastructure is already there, making it the fastest and simplest path.
Scenario 2: Customer-Facing SaaS Analytics
The Goal: Add an analytics module to a B2B SaaS platform for thousands of customers to see their own usage data.
The Users: External clients who have no affiliation with your Microsoft ecosystem and definitely don't have Power BI licenses.
The Verdict: Embed for your customers (app-owns-data). This is a no-brainer. You'll need to purchase Fabric capacity (an F-SKU) and use a Service Principal to manage authentication securely and at scale.
When you're embedding Power BI reports into an application using the "app-owns-data" model, getting authentication right is everything. This model is the standard for most SaaS products, where your app—not the end user—is responsible for authenticating with Power BI. Think of it as the gatekeeper that protects your data and ensures your application can scale securely.
The authentication method you choose has huge implications down the road. For a long time, the go-to (and only) option was a "Master User" account. This meant using a single Power BI Pro license tied to a real person's account to handle all embedding. I've seen teams do this, and it's like giving every user a master key to the entire building. It's a security and maintenance nightmare.
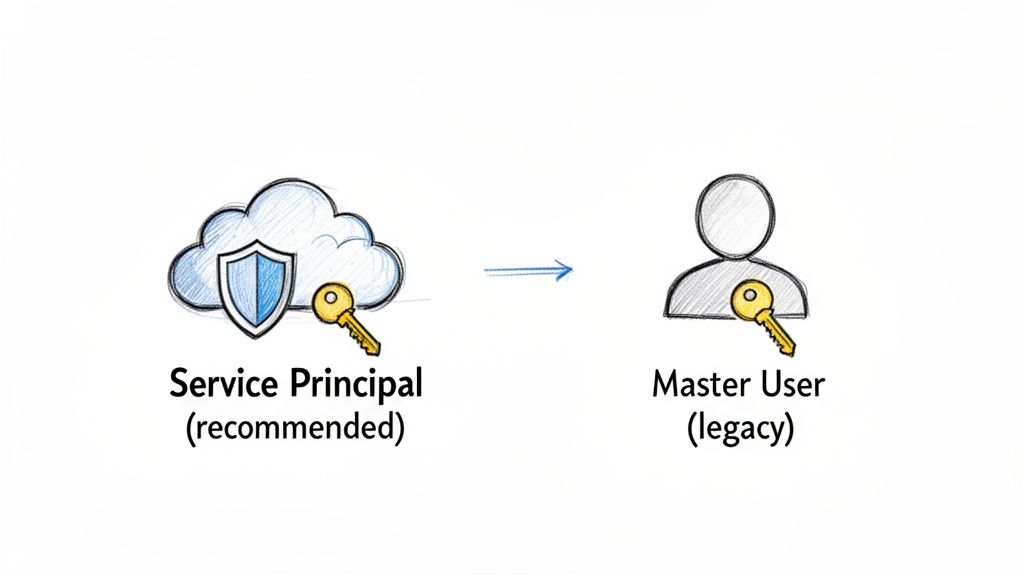
The Modern Standard: Service Principal
Thankfully, the "Master User" method is now considered a legacy approach. If you're starting a new project today, you should avoid it completely. The modern, secure, and Microsoft-recommended standard is to use a Service Principal.
So, what is it? A Service Principal is essentially a non-human identity that lives in Microsoft Entra ID (what used to be called Azure AD). It represents your application, giving it its own set of credentials and permissions. It can't be phished, you don't have to worry about a team member leaving the company, and its access can be locked down to only what it absolutely needs.
Here's a quick breakdown of why this matters so much:
Aspect | Master User (Legacy) | Service Principal (Recommended) |
|---|---|---|
Security | Low. Relies on a real user account, creating a single point of failure and a huge attack surface. | High. A dedicated, non-human identity with granular, role-based permissions. |
Scalability | Poor. API calls are throttled based on user limits, creating bottlenecks. | Excellent. Built for automated, high-volume API requests needed for a growing user base. |
Automation | Difficult. Storing user credentials securely for CI/CD pipelines is a major security anti-pattern. | Ideal. Designed for DevOps and automated deployment workflows. |
Maintenance | High. You're constantly fighting password expiry policies and MFA prompts on the user account. | Low. Managed programmatically with client secrets or certificates that have their own lifecycle. |
The choice is pretty clear. For any new power bi embedding work, starting with a Service Principal is the only way to build a foundation that's secure, scalable, and won't give you headaches a year from now. We dive even deeper into this in our in-depth guide to embedded analytics security.
Setting Up Your Azure AD App
Creating a Service Principal starts with registering your application in Microsoft Entra ID. This simple process generates a unique Application (client) ID and lets you create credentials (a client secret) that your backend will use to talk to the Power BI APIs.
Here’s the general game plan for getting this set up:
Register an Application: Head over to the Azure portal, find Microsoft Entra ID, and register a new application. This act creates both the application object and its Service Principal.
Create a Client Secret: Once registered, generate a client secret for your app. Treat this like a password. Store it in a secure location like Azure Key Vault—never, ever check it into your source code repository.
Configure Power BI Admin Settings: This is a crucial step that’s often missed. A Power BI administrator has to go into the tenant settings and explicitly allow Service Principals to use the Power BI APIs. You can even restrict this to specific security groups for tighter control.
Grant Workspace Access: Finally, you need to add your Service Principal to the Power BI workspace(s) it needs to access. Giving it "Member" or "Admin" rights allows your application to actually see and use the reports and datasets inside.
Remember, Power BI security doesn't exist in a vacuum. You should also be following established software security best practices for your entire application. By starting with a Service Principal and following these steps, you'll sidestep the most common vulnerabilities and build a powerful, protected analytics experience from day one.
Alright, so you've handled authentication. The next critical piece of the puzzle is bridging the gap between your backend application and the Power BI reports you want to show your users. This is done using embed tokens.
An embed token is a short-lived, single-use credential. It grants your web app temporary, specific permission to display a Power BI item—be it a report, a dashboard, or even just a single tile.
Think of it as a valet key for your data. You’re not handing over the master keys to your entire Power BI workspace. Instead, you're giving your application a specific key that only works for one report, for a limited time, and for a specific purpose (like viewing or editing). This is the absolute core of secure Power BI embedding.
Your application's backend is responsible for generating these tokens on demand. It authenticates with Power BI (using the Service Principal we set up), calls the Power BI REST API, and gets a token back. That token is then passed down to your frontend code, which uses it to bring the report to life.
The Role of a Backend Token Broker
One non-negotiable best practice is to handle all this token generation through a dedicated backend service—what's often called a "token broker."
Never, ever put your Service Principal credentials in your client-side code (like JavaScript running in a browser). Exposing those credentials directly to the client would be a catastrophic security vulnerability, allowing anyone to gain high-level access to your Power BI environment.
The correct architecture looks like this:
Your frontend app makes a secure API call to your backend, asking for a token for a specific report.
Your backend server then authenticates itself with Microsoft Entra ID using its protected Service Principal credentials.
It calls the Power BI
GenerateTokenAPI endpoint.Finally, it sends the freshly generated embed token back to the waiting frontend.
This keeps all your sensitive credentials safely locked away on the server.
Crafting the API Request
To get a token, your backend service makes a POST request to an endpoint that looks something like this: /v1.0/myorg/groups/{groupId}/reports/{reportId}/GenerateToken.
The body of this API call is a JSON object where you define exactly what the user is allowed to do. The accessLevel parameter is key here. You can set it to:
View: The most common and secure choice. The user can see and interact with the report but can't change it.
Edit: Grants permission to modify the report and save those changes. Use this with extreme caution.
Create: Allows for creating entirely new reports based on an existing dataset.
I’ve seen projects where developers default to granting ‘Edit’ access "just in case," but this is a mistake. Always follow the principle of least privilege. If a user only needs to view a report, generate a ‘View’ token. This minimizes the risk of accidental or malicious data alterations.
The request body is also where you'll define Row-Level Security (RLS) identities to ensure users only see the data they're supposed to, a topic we’ll dive into next.
Here’s a look at the official Microsoft documentation, which shows the JSON structure for a token request.
As you can see, the JSON payload clearly defines the accessLevel and identities, giving you precise control over permissions and data visibility.
Managing the Token Lifecycle
By default, embed tokens have a lifetime of one hour. This isn't a bug; it's a security feature. If a token were ever intercepted, its usefulness is severely limited by time. But it does mean you need a plan for users who keep your application open for longer sessions.
Fortunately, the Power BI JavaScript SDK has you covered. It provides a tokenExpired event that your frontend code can listen for.
When this event fires, your app simply makes another call to your backend token broker for a fresh token. Once received, you use the embed.setAccessToken() method on the client side to update the active session. This entire process happens seamlessly in the background, giving your user a smooth, uninterrupted experience.
Securing Your Data with Row-Level Security in a Multi-Tenant World
When you're building a SaaS application that serves multiple customers, data privacy isn't just a nice-to-have; it's a non-negotiable requirement. Your clients need an absolute guarantee that their information is walled off from everyone else. In the context of Power BI embedding, your go-to solution for enforcing this separation is Row-Level Security (RLS).
RLS is a game-changer because it lets you use a single, unified report for all your tenants. Instead of juggling dozens of report versions, you maintain just one. RLS then dynamically filters the data each user sees based on who they are, ensuring they only see what they're supposed to.
This level of flexibility is essential. The market for embedded analytics is incredibly diverse, with different industries having unique needs. For example, in 2025, ERP and CRM systems made up 34.62% of the market, while the financial services (BFSI) sector led end-user adoption at 25.40%. At the same time, healthcare was the fastest-growing vertical with a 16.30% CAGR. These figures show that a one-size-fits-all approach to data just doesn't work, making a dynamic security model like RLS indispensable.
Starting in Power BI Desktop: Defining RLS Roles
Your journey with RLS begins not in your application's code, but right inside Power BI Desktop. This is where you lay the groundwork by defining the security rules, known as roles.
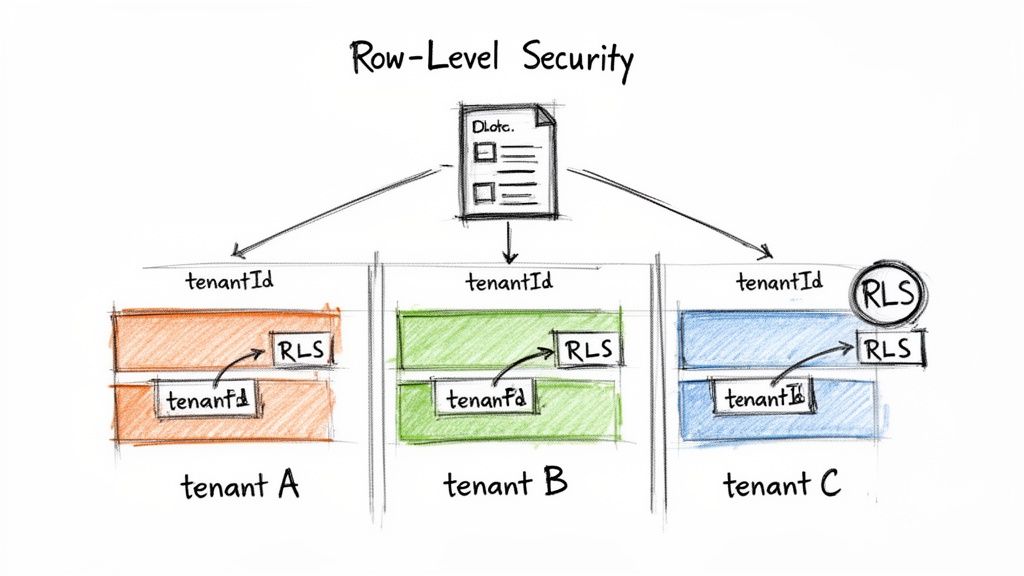
Think of a role as a filter that automatically applies to your data model. For a typical multi-tenant setup, you'll create a role that filters everything based on an identifier like a TenantID or CompanyID.
Let's say you have a Sales table containing a TenantID column. You would create a role, maybe call it TenantFilter, and apply a simple DAX expression to it:
[TenantID] = USERNAME()
The USERNAME() function is the key here. It's a placeholder. When you eventually generate an embed token for a user, you'll pass a specific TenantID that will slot right into that USERNAME() function, effectively filtering the entire report.
A pro-tip from my own experience: always create one generic RLS role based on an ID. Avoid the temptation to create a new role for every single customer. The single-role approach is infinitely more scalable and saves you from having to update and republish your Power BI file every time a new client comes on board.
Applying Security When Generating the Embed Token
Once your roles are defined in the .pbix file and published to the Power BI service, the real action happens on your backend. This is the moment you tie a user session in your app to a specific, filtered data view in Power BI.
When your application's server calls the GenerateToken API, you’ll include an identities object in the request body. This is where you tell Power BI who the user is, which RLS role to enforce, and which dataset it applies to.
Following our example, the identities payload for the TenantFilter role would look like this:
"identities": [
{
"username": "tenant-123",
"roles": ["TenantFilter"],
"datasets": ["your-dataset-id"]
}
]
Here’s what’s happening in that snippet:
"username": "tenant-123"is the value that dynamically replaces theUSERNAME()placeholder in your DAX rule."roles": ["TenantFilter"]tells Power BI exactly which role to apply."datasets": ["your-dataset-id"]specifies the dataset to which the rule should be applied.
When your front-end application uses this token to embed the report, Power BI's engine automatically filters every single visual to show only the data where the TenantID column matches "tenant-123". The user has no idea that other tenants' data even exists in the same dataset, and more importantly, they have absolutely no way to access it.
This technique combines your own backend logic with Power BI's powerful security engine to create a truly secure and scalable solution. For a much deeper dive into this topic, check out our guide on implementing RLS in a SaaS environment.
Bringing Reports to Life on the Client-Side
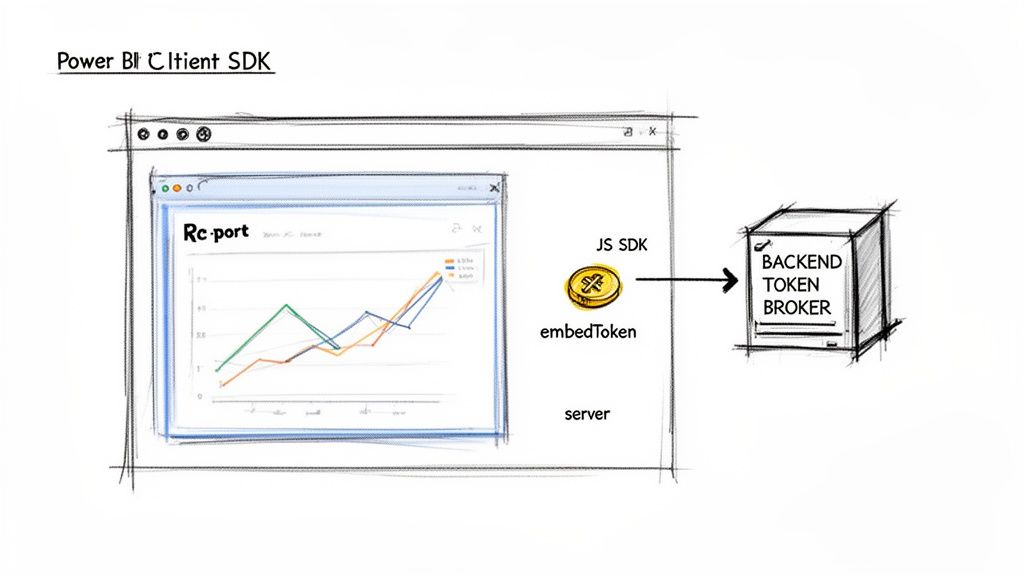
Okay, you've set up your backend to generate secure embed tokens. Now for the fun part: actually getting the report to show up and work inside your application. This all happens on the frontend, and the primary tool for the job is the Power BI JavaScript SDK. Think of this library as the glue connecting your web app directly to the Power BI content you want to embed.
The flow is pretty simple but very secure. Your application's frontend code makes a call to your backend server, asking for an embed token. Once your server provides that short-lived token, your frontend uses the SDK to initialize and load the Power BI report into a designated spot on the page. This keeps all your sensitive credentials locked away on the server, where they belong.
By handling the rendering on the client side, you gain a massive amount of control over the user experience. You're not just dropping in a static iframe; you're integrating a dynamic, interactive component right into your application's DNA.
Basic Embedding with Plain JavaScript
Getting a report embedded using plain JavaScript is refreshingly straightforward. First, you'll need to add the SDK to your project, which you can do with a simple script tag or by installing it from npm. You’ll also need an empty <div> in your HTML to serve as a container for the report.
Next, you assemble a configuration object. This is just a plain JavaScript object that tells the SDK what to load and how to authenticate.
type: This defines the content you're embedding. Most often, it will be 'report', but it could also be 'dashboard' or 'visual'.id: The unique GUID of the Power BI report itself.embedUrl: The specific URL for embedding that report, which you can grab from the Power BI service.accessToken: This is the crucial, short-lived embed token you just fetched from your backend.tokenType: For embedding, this is set tomodels.TokenType.Embed.
With the config object ready, you make one call to the powerbi.embed() function, passing in your container element and the configuration. The SDK takes it from there, rendering the fully interactive report right inside your div.
Integrating with Modern Frameworks like React
While plain JS is great for simple cases, you're probably working with a modern framework like React, Vue, or Angular. The good news is that the SDK plays nicely with all of them. In a React app, the best practice is to wrap the embedding logic in its own reusable component.
For example, you could build a <PowerBIReport /> component that accepts props like reportId and datasetId. Inside this component, a useEffect hook is the perfect place to manage the report's lifecycle.
Make an async call to your backend API to get the embed token.
Once you have the token, build the configuration object using it and the component's props.
Use a
useRefhook to get a stable reference to your containerdivand callpowerbi.embed()to render the report.
This component-based strategy keeps your code organized and reusable. You can drop your <PowerBIReport /> component anywhere you need it, just like any other piece of your UI.
From my experience, abstracting the embedding logic into a dedicated React component is a huge time-saver. It allows you to manage the report’s lifecycle cleanly, handle token refreshes efficiently, and easily pass down dynamic filters as props, making your analytics truly interactive.
Creating a Two-Way Interactive Experience
Just displaying a report is only half the story. The real value of the client-side SDK comes from enabling a two-way dialogue between your application and the embedded Power BI content. This is what makes the analytics feel like a native part of your product.
You can listen for events that happen inside the report. For example, by subscribing to the dataSelected event, your application can be notified whenever a user clicks a data point. You can then grab the context of that selection and trigger an action in your app, like popping up a modal with related records or navigating to a different view.
The communication goes both ways—your application can also control the report programmatically. You can:
Apply Filters: Dynamically update report filters based on what the user is doing elsewhere in your app.
Navigate Pages: Change the visible report page without requiring the user to click the page tabs.
Update Layout: Modify layout and display settings on the fly.
Imagine you have a global search bar in your app's header. A user types in an account name, and as they type, your app applies a filter to the embedded report in real-time. The report instantly updates to show data only for that account. This level of deep integration erases the boundary between your application and your analytics, creating a single, cohesive experience for your users.
Answering Your Power BI Embedding Questions
When teams first start exploring Power BI embedding, a few key questions almost always come up. From sorting out the costs to planning for future updates, getting these fundamentals right from the start can save you a lot of headaches down the road.
Based on our experience helping teams get their embedded analytics off the ground, here are the straight answers to the most common sticking points.
Can I Embed Power BI Reports for Free?
Let's get this one out of the way first. While you can absolutely use a standard Power BI Pro license or a free trial to build and test your proof-of-concept, there is no free option for a live, production application.
For any customer-facing app using the "app-owns-data" model—which is the standard for most SaaS products—you'll need to purchase dedicated capacity. This means you have to budget for one of two things:
A Microsoft Fabric capacity (an F-SKU)
A legacy Power BI Embedded capacity (an A-SKU)
These SKUs give you the dedicated processing power needed to serve reports to your users, and critically, your users won't need their own Power BI licenses to see the data.
How Do I Handle Report Updates Without Downtime?
The last thing you want is for your users to experience errors or see a broken report while you're pushing an update. The professional way to handle this is by implementing a proper CI/CD workflow using Power BI's deployment pipelines.
This setup usually involves creating separate workspaces in the Power BI service for Development, Testing, and Production. You can build and tinker with your report in the Dev workspace, and once you're happy, promote it to the Test environment for QA.
When it’s ready to go live, you can use the Power BI REST APIs to programmatically deploy the changes to your Production workspace. This automated handoff is seamless and ensures your users are never interrupted.
What’s the Difference Between A-SKUs and F-SKUs?
This is a huge point of confusion right now, especially with Microsoft's big push towards its new platform. Here's the simple breakdown:
A-SKUs are the original "Power BI Embedded" capacity you purchase directly in Azure. They are built for one purpose: providing the horsepower for embedding analytics.
F-SKUs are tied to Microsoft Fabric, the company's all-in-one analytics platform. Buying an F-SKU gets you all the embedding capabilities of an A-SKU plus access to other Fabric tools like Data Factory and Synapse.
While A-SKUs are still available, all signs point to Microsoft Fabric being the future. If you're starting a new project, we strongly recommend going with an F-SKU. It sets you up on their strategic platform and gives you a much more integrated path forward.
Can Users Save Their Own Filters in an Embedded Report?
Yes, they can, but this feature isn't available out of the box. You'll have to build this functionality into your application.
The Power BI Client-Side SDK is your tool for this. It has methods that let you capture the exact state of a report—including any filters, slicers, or drill-down paths a user has applied. You can grab this configuration as a "bookmark" object.
From there, your application's backend can save that bookmark data in your own database and associate it with that user's account. The next time they log in, you simply retrieve their saved bookmark and use the SDK to apply it to the report, instantly restoring their personalized view.
At Querio, we help you go beyond static reports. Our AI coding agents work directly on your data warehouse, enabling your entire team to build self-service analytics and customer-facing data experiences without the usual bottlenecks. Explore how Querio can scale your data team.

